Can you chainsaw carve with an electric chainsaw? YES YOU CAN!
Before we continue, I need to make something clear: before my fascination with the art of chainsaw carving I had never used a chainsaw. I had never even touched a chainsaw. In no way am I an expert at chainsaws let alone chainsaw carving.
While I am far from having any expertise in chainsaw carving, I do love making things. In this article I chronicle my journey as I research and experiment with different types of chainsaws.
Once I had made the decision to learn how to chainsaw carve, the next step was to find a chainsaw to carve with. Having watched just about every YouTube video available on chainsaw carving as well as the TV show Carver Kings on Netflix, I was pretty much under the impression that a gas chainsaw was the only way to go.
If you spend any amount of time on YouTube watching videos on chainsaw carving you will see that 99% of videos posted online use gasoline-powered chainsaws. Gasoline powered chainsaws have several distinct advantages: they provide the power needed to make large cuts and there is no need to deal with dying or dead battery packs or extension cords. But I did not want to deal with gasoline and the maintenance required to keep an internal combustible engine running.
As a do-it-yourself woodworking hobbyist, all of my power tools are plug-in or battery-powered. Being accustomed to using electric powered tools, I naturally gravitated towards the chainsaws powered by electricity. After doing much research, I came up with the following information.
GASOLINE CHAINSAWS
PROS: Powerful, can go all day as long as you have fuel, it’s what the pros use.
CONS: Loud, fumes, many engines require mixing gasoline with additives
CONS: Underpowered, batteries don’t last very long.
ELECTRIC CORDED CHAINSAWS
PROS: Lightweight, good power, quiet, unlimited power as long as you are near an outlet, low maintenance.
CONS: Need to be near an outlet or use extension cords.
Because I could not find much information on chainsaw carving using anything but gasoline-powered chainsaws I had to do my own experimentation. It is important to understand that when discussing chainsaws powered by electricity, there are two types: electric chainsaws and battery chainsaws.
When referring to an electric chainsaw, you are referring to an electric corded chainsaw that requires an extension cord and plug for power. Battery powered chainsaws on the other hand use rechargeable batteries for power and are cordless.
Because many of my power tools are of the Ryobi brand, my first foray into chainsaws was a battery powered Ryobi chainsaw. I figured since I already owned 5 Ryobi batteries, two regular chargers, and a quick charger, that I would be able to get through much of a project with the gear that I already owned.
I was super excited for my first ever chainsaw from Home Depot, a Ryobi Brushless Lithium-Ion Electric Cordless Chainsaw. With my five batteries fully charged and ready to go, I put on my safety gear and went to the yard to begin cutting.
Unfortunately, the Ryobi battery powered chainsaw proved to be underpowered for chainsaw carving. Each fully charged battery would provide anywhere from 2 to 5 minutes of cutting time. And even with my quick charger, which takes about 30 minutes to charge a battery, the frequent interruptions of dead and dying batteries as I tried to carve led to much frustration.
Also, because the battery packs would heat up during use, this rendered them unchargeable until they had cooled down. So after about 20 minutes of carving with my underpowered battery chainsaw and 5 battery packs, I was forced to take off my safety gear and find something else to do until all my battery packs had charged.
Because I would hurry to make cuts on my first ever chainsaw carving to try to get as much done before my battery pack would die, I would make careless mistakes. Eventually I gave up on the project.
I was disappointed that my battery powered chainsaw experiment had failed. The advantages to battery power are the lack of having to deal with mixing gasoline, decreased noise, and decreased maintenance. So I quickly returned the Ryobi battery powered chainsaw and borrowed a gas-powered chainsaw from a friend.
I had high hopes for the gasoline powered Chainsaw by Stihl because just about everyone you see on TV and on YouTube uses a gasoline powered chainsaw. While I was concerned about the noise that a gasoline powered chainsaw would produce given my close proximity to my neighbors, at this point I just wanted to start carving. Unfortunately, I was again led to disappointment as the gasoline powered chainsaw that had sat in my friend’s garage unused for years would not start.
At this point, I was ready to give up all together on chainsaw carving. But I decided to give an electric corded chainsaw a shot. After researching my local stores and Amazon for electric chainsaw options, I realized that I did not want to go cheap with my electric chainsaw but at the same time I did not want to break the bank.
I decided on the Makita UC4051A 16″ Electric Chain Saw which was not the most expensive corded electric chainsaw available, but it was more expensive than most of the cheaper chainsaws that you will find in stores and on Amazon.
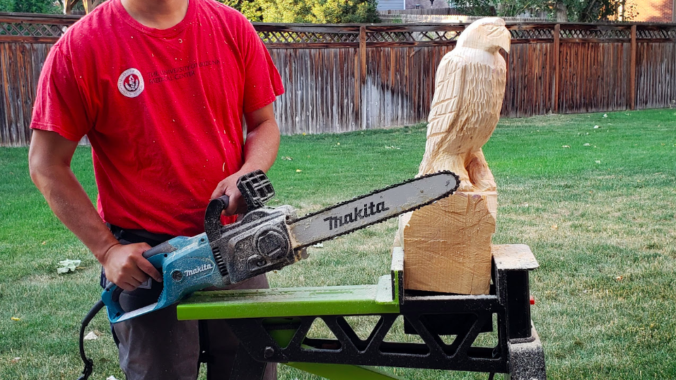
After I put together my Makita electric chainsaw, I took it to the yard to see if it could do any better than the battery powered chainsaw. It didn’t take me long to realize the night and day difference between the two chainsaws. The Makita electric corded chainsaw was much more powerful than the battery powered chainsaw and I was able to make the necessary cuts without difficulty.
In one day, I was able to complete my first ever chainsaw carving with my Makita electric chainsaw. I absolutely love this chainsaw. It is relatively quiet compared to gasoline powered chainsaws and besides the power cord, the only thing it needs bar oil so the maintenance is very minimal compared to its gasoline counterparts.
While being tethered to an extension cord can be a disadvantage, because most of my carvings will take place in my backyard or near my garage, I will always be near a power source. Having an extension cord is much less of an inconvenience compared to battery packs that last no longer than 5 minutes.
Now I have a chainsaw that I am proud of and that I can use for chainsaw carving art work as well as for projects around the house. The Makita electric chainsaw revived my dying interest in chainsaw carving after failed experiments with a battery powered chainsaw that lacked stamina and an old gasoline powered chainsaw that would not even start.
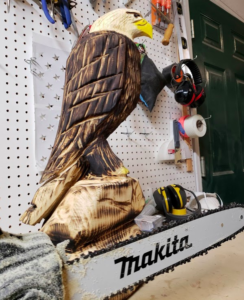
On the 4th of July I carved a bald eagle. I had no problems with the Makita chainsaw. There was no stalling, no noxious fumes or exhaust, no need to mix gasoline, no excess noise, and I felt that I had plenty of power needed to complete the project.
With my first completed chainsaw carving, I can tell you that it won’t be my last. Chainsaw carving was a ton of fun; more than I expected it to be and I was very pleased with the final result. I suspect that as I become more serious in the hobby, I will be purchasing more chainsaws of different sizes. As for now, as a beginner chainsaw carver, I feel that the Makita electric chainsaw is perfect for what I want to do.
So can you chainsaw carve with an electric chainsaw? Yes you can! If you’re looking for a chainsaw and like me you don’t want to mess with the hassles that come with a gasoline powered chainsaw such as noise pollution, noxious fumes, and mixing fuel, then you should seriously consider an electric corded chainsaw.
I did not have much luck with a battery powered chainsaw however as the technology improves, I’m sure a capable and affordable battery powered chainsaw to rival corded electric and gasoline powered chainsaws will come in the future. I’m going to enjoy my corded electric chainsaw as I work on my new hobby of electric chainsaw carving. If you are looking for a corded electric chainsaw to carve with, I highly recommend the Makita UC4051A 16″ Electric Chain Saw (check out Amazon for pricing).
I’m a man of many hobbies, many of which I learned simply from researching the internet and watching YouTube videos. It is amazing, how much you can learn with the resources available on the world wide web.
Some of my hobbies where a bulk of my knowledge came from the internet include woodworking, cartooning, blogging, website design, writing and publishing ebooks, skiing, camping, basketball (both playing and coaching), and playing instruments like the ukulele, guitar, and piano.
Well, let’s add another hobby to that list: chainsaw carving. Where did this crazy interest come from? No, I am not a lumberjack. I don’t cut down trees for a living. In fact, before this chainsaw phase in my life I had never even touched a chainsaw.
I’ve always enjoyed art. I love creating things. For a while my favorite medium was paper and I would just doodle. Then I learned how to make my drawings into digital cartoons that I posted online.
While volunteering as a scoutmaster for my son’s troop, I was introduced to woodcarving. Along with the scouts, I carved out a fish with a pocket knife. It was a ton of fun, but I felt like it took way too long. I felt there had to be a way to create wooden works of art more quickly and efficiently.
I did my research which led me to purchasing a Dremel. The love for woodworking grew and so did my power tool collection. After the Dremel I got a circular saw followed by a jig saw, then a miter saw, orbital sander, table saw, planer… the list goes on.
Then, on a recent family vacation road trip through Wyoming, Montana, Idaho, Utah and Colorado I saw some large carved bears while on a stop in Idaho and I thought to myself, if only I had a chainsaw I could certainly do that!
Whether it be on vacation in Hawaii, where the seed was planted into my head that I could learn the ukulele (which I did) or while sitting on my couch watching a TV show about zombies which inspires me to make a piece of wood art (see more here), every now and then I find challenges for myself to learn something new.
Why Chainsaw Carving is a Great Form of Artwork
Chainsaw carving is appealing for multiple reasons. It combines the raw power of the chainsaw and the beauty of wood to make amazing pieces of art in relatively short periods of time.
When most people think about the chainsaw they think of massacres and destruction. The power tool evokes images of crazed murderers and decimated rainforests.
While a healthy dose of fear and respect is needed when operating such a powerful tool, the chainsaw is a tool of more than just destruction.
I think of the Chainsaw as the tool I was looking for many years ago to help me complete my woodworking art projects in a quicker and more efficient manner. In experienced hands, large pieces of wood can be transformed into beautiful creations in a matter of days.
Another benefit of Chainsaw carving is the medium which is used to create art. When done correctly the beginner chainsaw carver can easily find wood cheaply or for very low prices. In the winter, depending on where you live, you may even be able to consider chainsaw ice carving as a crossover hobby.
The other great thing about chainsaw carving is the actual production of the art piece can also be considered a form of entertainment. Oftentimes, you can find crowds enthralled by live chainsaw carving demonstrations at functions such as county fairs and rodeos.
How I Got Started in Chainsaw Carving
So when I got home from that road trip vacation I watched just about every YouTube video on chainsaw carving that I could find. I then order a book on how to chainsaw carve bears, and while waiting for that to arrive I binge watched the Netflix show “Carver Kings” which, if you couldn’t guess, is about chainsaw carvers.
I also researched the internet, searching discussion boards, and learning everything I could about chainsaw carving equipment and safety. I ordered a chainsaw, chainsaw bar and chain oil, and a pair chainsaw chaps (protection for your legs).
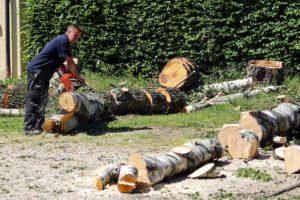
While driving home one day I saw a home that had recently cut down a pine tree. I knocked on the door of the home and asked for some logs. Multiple trips later I had some big logs ready to play with.
Now, with all the pieces ready, I still felt pretty insecure about operating a chainsaw. I felt that I needed to talk to someone who had actually carved with a chainsaw. I found a chainsaw artist not too far away and was able to speak to her. I even asked if she would be willing to give me a lesson but she didn’t do that kind of thing and her schedule was too busy. But before ending our conversation, she did give me one piece of important advice: be safe.
But without a teacher to guide me, I procrastinated. The fire within me for chainsaw carving was burning out and I’m sure it would have been replaced by some other passing fascination. Then while on the internet I found a quote that stuck with me:
“Would-be woodcarvers would be woodcarvers if they would carve wood.”
That was it! If I wanted to learn, I just needed to jump in there and start carving! And that is how it all started.
So for all you folks out there that are interested in chainsaw carving, below are steps that I took to get started. I’m a guy with soft office worker hands who had never touched a chainsaw. Now I’m making my own unique designs!
In full disclosure, my first few pieces were pretty crappy. But hey, you have to start somewhere and if you mess up, it’s only wood! Get yourself a nice fire pit for all your mistakes, learn from your mistakes, enjoy the fruits of your errors, and roast a marshmallow.
Everything I know about chainsaw carving I learned from the internet. This is how I got started:
Step 1: Understand Chainsaw Safety
Learning and practicing chainsaw safety is a lot easier than learning how to care for a chainsaw inflicted wound to the leg or hand. Take the time to understand how to properly use a chainsaw. Don’t skimp on safety gear. A trip to the ER is much more costly than anything you would spend on chainsaw safety equipment.
When thinking about chainsaw safety gear, start from the head and go down to the toes.
A helmet and face guard are recommended to protect your face in case of kick back. Kick back is when the tip of your chainsaw hits a snag which forces the chainsaw to kick up, usually towards your face.
If you don’t wear a face guard, at least consider eye protection such as safety goggles. You will also need protection for your ears in the form of disposable ear plugs, noise cancelling earphones or headphones, or full-on hearing protection earmuffs.
Moving down the body, you should wear work gloves to help protect your hands from the constant vibration from the chainsaw. Gloves will also protect your hands from getting injured from wood.
Chainsaw chaps are necessary to protect your legs. It’s almost like an apron for your legs. Within the fabric of the apron are Kevlar strands which bind up and stop your chainsaw before it gets the chance to really dig into your leg. This is vitally important as most injuries from chainsaws occur on the left leg.
Finally, to protect your feet you should wear sturdy footwear. If you are able to, steel-toed boots are recommended.
Step 2: Get Your Equipment
While you probably think the most important gear for using a chainsaw would be the chainsaw, in actuality the most important piece of equipment when using a chainsaw is the chainsaw safety equipment which I outlined up above.
Once you are safely equipped, you can now look into using your chainsaw. I know the professionals preferred trusted chainsaw brands like Stihl and Echo. However, for a do-it-yourself guy like me who has zero experience with chainsaws, I wanted to chainsaw that was affordable and that I could use around my home and for future woodworking projects even if I should I decide I’m not cut out to be a chainsaw carving artist.
After doing my research, and a little bit of trial and error I came to the conclusion that the best fit for me would be an electric chainsaw.
I know many chainsaw carvers around the world would cringe at the fact that I purchased an electric chainsaw to pursue the art of chainsaw carving but I have my reasons which I will explain in detail in a future post. Nevertheless, through my research I found that the best electric chainsaw around is made by Stihl, the Stihl corded chainsaw MSE 170C-BQ. But no stores near me carry this chainsaw, and places that carried the chainsaw online didn’t offer quick shipping. On top of that the chainsaw is not cheap, costing over $300.
The next best corded chainsaw that I could find was the Makita US4051A 16 inch electric chainsaw. This very highly reviewed chainsaw was available at Home Depot and also online on Amazon which offered 2-day shipping and a cheaper price. I decided that saving money would be a good idea when my wife would inevitably ask me about why we were getting another big box with a smiley face delivered to our front door. Check out Amazon for current pricing and details.
Gas Chainsaw VS Electric Chainsaw VS Battery Chainsaw
If Tesla made a battery powered chainsaw, I would be all over it. But until that day, I think it is best to stick with gasoline or an electric corded chainsaw.
Battery Chainsaw: My first chainsaw did not last long. I got a Ryobi battery powered chainsaw because I already had so many other Ryobi battery powered tools in my garage. I figured, with 5 batteries, that would last me well into a project. But to my dismay, the batteries would last no longer than 5 minutes, some batteries only lasting 2 minutes! For this reason, I returned the chainsaw and I can not recommend a battery powered chainsaw for anything other than light duty work cutting branches.
Gasoline Chainsaw: Gas chainsaws are the tried-and-true tool for any chainsaw carver. Look up chainsaw carving on YouTube and you will have a hard time finding a professional using anything but a gasoline powered chainsaw. Gas chainsaws are more powerful and can be used anywhere, from the backyard of your house, or deep in the forest. With gas chainsaws you don’t have to worry cords or batteries. As long as you have the correct mixture of gasoline nearby, you are good to go.
Electric Chainsaw: Electric chainsaws are fairly new to the game. That is one reason why you don’t see very many people using them for chainsaw carving. In addition, there is the hassle of dealing with an extension cord. That being said, electric chainsaws are much quieter than their gas counterparts and do not admit noxious exhaust fumes. Electric chainsaws are also lighter than gasoline chainsaws and because they have fewer moving parts, there is hardly any maintenance. Another benefit to the electric chainsaw is if you have a good power source and extension cord, you won’t have to worry about keeping gasoline on hand, making trips to the gas station, and mixing fuel.
I already had a 100-foot extension cord but I made sure to purchase some high-quality Bar Oil. That was it. One of the great benefits of the electric chainsaw is that they have fewer moving parts then a gas-powered motor and therefore require less maintenance.
There are a whole host of other woodworking tools that you can purchase to get the finishing detail just right. However, as a beginner, I feel two other tools are important to help achieve a great look. These two tools are an angle grinder and a torch.
Step 3 Getting Wood
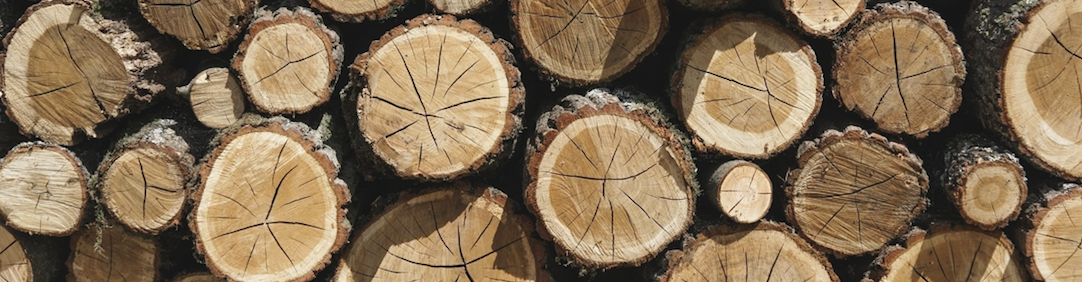
As a beginner just getting into the art of chainsaw carving, the best type of wood to use is the easiest wood you can get your hands on. Depending on where you live, wood logs may be plentiful or they may be difficult to obtain.
Don’t spend too much money on wood at this point if you can. Starting out on free wood gives you more liberties to just start carving with the chainsaw. There is less worried about messing up if you are carving on a free piece of wood versus a log that you spent a good amount of money on.
Where can we find free wood? So far all of my wood has come from tree cutting projects that I have driven by and asked if I could have some of the wood. Every time, folks are more than willing to part with their wood.
If you don’t have neighbors cutting down old trees in your area, Craigslist is a great option. Just search for wood or logs and you’ll be surprised at what you’ll find in your area.
You can also call local tree cutting businesses. Often times they have stockpiles of wood or they can direct you to their next project where there is free wood to be had.
Once you get your hands on some wood, take the time to remove the bark from the wood. This will clean the wood of any debris and also help you identify any nails that may be hidden in the wood. If you don’t feel like taking off the bark from the tree, the least you can do is make sure to clean off any dirt on the wood that may dull your chainsaw.
Step 4 Planning Your First Project
Bears are the most popular searched for chainsaw carving term on Google, followed by eagles. But as a beginner, for your first project I recommend something very simple and foolproof like a mushroom.
The mushroom is a great first project because it is fairly simple with symmetrical lines and the finished project can be quite beautiful. In addition, mushrooms come in all shapes and sizes so think about the type of mushroom you would like to carve and go for it.
Depending on the season, other great beginner projects are pumpkins and Christmas trees. Again, the cuts are fairly simple and easy to understand and depending on the pumpkin or Christmas tree design that you cut, the lines are usually symmetrical. If you get this project done in time, this can be a great display in front of your home ready for Halloween and Christmas.
Another great beginner project that is also practical is the log chair which only requires a few simple cuts. Some great patterns can be found here.
Step 5 Finding the Appropriate Workspace
A good safe work space is important to the success of any project and hobby. Make sure you have a good clean and clear area to work.
One of the great things about chainsaw carving is that you get to work outdoors. However, with working outdoors comes challenges from exposure to the elements. If you have an area in your yard where you can work, consider putting up a canopy so that you have cover from harsh sunshine and rain.
If you are using a gas chainsaw, considerations will have to be made about noise pollution that your neighbors may find irritating. Finding an area to work where the noise won’t drive your neighbors bonkers will be important to the longevity of your newfound hobby.
One solution to those working in conditions where noise is a concern is the electric chainsaw. Electric chainsaws produce much less noise so bothering the neighbors is less of a concern but you will need to make sure that you have a nearby power source and an extension cord long enough to power your chainsaw.
Step 6 How to Stabilize Your Wood for Cutting
Since most of the wood that you will be finding for free and transporting on your own won’t be huge 6 foot logs, you will need to find a way to keep your logs stable. A good beginner size for a log is less than three feet in length and 14 inches in diameter. Bending down to carve on this piece of wood as it rests on the floor will be hard on your back. In addition, working on a piece of wood that may be unstable or tip over as you are cutting is unsafe. Therefore it is important to have a way to elevate and stabilize your wood appropriately for when you are carving.
My favorite tool for this purpose is called the Jawhorse Adjustable Sawhorse by Rockwell. This thing is awesome! It provides a great way to hold your piece of wood in a stable manner and is very easy to use. I love this thing so much I will be making a separate post just for this handy device. In the meanwhile, check out Amazon for details.
However, if you are just starting off and do not want to buy yet another piece of equipment, there are quick and easy ways to stabilize your wood for when you are working.
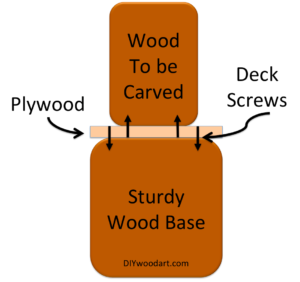
A quick do-it-yourself way to stabilize and elevate your piece of wood is to screw a piece of plywood to the bottom of your log. Then set the log with the plywood on top of a larger log which is firm and stable on the ground. At this point, screw the plywood base into the larger log which is set on the ground.
There you have it, a quick and easy way to have your piece of wood stabilized and elevated so that you can work safely without having to strain your back. See the diagram for details.
Step 7 Get Cutting
You’ve gathered all the equipment and materials and you’ve done all your homework. Now it’s time to cut. I was surprised how difficult it was for me to make the leap and to actually perform that first cut into the wood. I planed my attack. I had my lines drawn and I was ready to roll. But for some reason, I could not stop perseverating over and over again in my head that I was forgetting something. Seeds of doubt crept into my head and I kept thinking that I was going to totally screw up or suffer a mortal wound by my own hands.
Finally I built up the courage and made my first cut. Subsequent cuts were much easier and pretty soon I was rocking and rolling. I had a great time carving off large chunks of wood until I realized I was cutting too much wood off. When I stopped the chainsaw and looked back, I realized that I had been a little overzealous with my fun.
If you are satisfied with your chainsaw carved creation, there are several ways that you can finish the wood to give it a great look. My favorite way to finish wood is to use a small torch and to burn the wood. After burning the wood you can use a wire brush to achieve the desired final effect.
Burning the wood is one of my favorite techniques. Not only is using a torch almost as enpowering as using a chainsaw, by burning of the wood you eliminate all the little strands and fuzzies get left from using the chainsaw.
Burning also add great color to the wood and helps to protect the wood. The Japanese have used a technique called shou sugi ban (焼杉板) which is essentially burning the wood to waterproof and to protect the wood from the elements and from insects. It is a time tested technique that replaces the need for different chemical finishes and varnishes.
While I was a little disappointed that my first carving was not a masterpiece, I was excited that my career as a chainsaw carving hobbyist had officially begun. Carving with the chainsaw is like no other woodworking tool that I have ever used. The chainsaw has a raw power and flexibility that makes it so versatile and so efficient. But at the same time, it’s the same power and flexibility of the chainsaw that demands respect. Therefore, I can’t emphasize enough the importance of safety.
To all those who aspire to learn how to chainsaw carve, be careful, be safe, and have fun.
Welcome
My name is James and I love to build and create wood art in my garage. DIYwoodart.com chronicles my growth and experimentation in the art of woodworking.
If I can do it, you can too! This site is for woodworking hobbyists looking for inspiration.